Showing posts with label Fabric. Show all posts

Wednesday, August 31, 2011

Scrap Ruffle Necklace


I recently saw a necklace on pintrest and I really liked it. (Her shop is very cute by the way, I will take any of those items!) 
I knew that it really could not be all that hard to make, so I tried it. It turned out really well, not as good as hers, but still pretty good for free.  
I started with a necklace I was not using, and a fabric scrap. I think it was about 2 1/2" wide and 8" long. 
 Because I used a fabric that frays very easily, I first used a zig-zag stitch to prevent further fraying.
 Now we can sew our ruffle.  I used  a 1/4" seam allowance, and folded the fabric in half.
 Use the normal extra long stitch, and pull one thread to create a ruffle. Once the ruffle is the desired length, the ends can be tied off, so the ruffle does not come out. Now you can simply use a safety pin to thread the necklace through the ruffle, and you are done.
 Now you can trade out that ruffle to match any outfit. I like to wear my navy ruffle necklace with a salmon colored tank, and navy cargo pants. So many options, and it adds just a little cuteness.


Wednesday, August 10, 2011

Nursing Cover

I am on a no fabric buying thing lately. I am not even allowing myself to look at any fabrics. It is really hard, but the Hubby sure is happier.
One of the things that I wanted to make with some extra fabric was a nursing cover. It was really fast, and easy, just my kind of project. The fabric is slightly girly, but I still like it much better than my other boring black nursing cover. I used prudent baby's tutorial.
 The boning at top makes it easy to see baby, and he can get a little fresh air too.
 Of course I had to add my own little personal touch.
This would make a great gift for a new mom, and can be made in very little time. Try it out!

Friday, August 5, 2011

Easiest Kitchen Curtains Ever!

I think that these cafe curtains are the easiest curtains you could make! They are just what I wanted for this area, and today I will show you the full how-to, not like you need it, they are that easy!
Here is what I was working with before. (The Colorado summer storm was rolling in, sorry for the dark pictures.) I always wanted some sort of window treatments on these windows. But I could not figure out what to do, because of the way the cabinets are so close to the window.

 How could you put a curtain rod anywhere near here without drilling into the cabinets? Thanks builder! That no longer builds in Colorado, by the way.
 So instead of drilling into the cabinets, I decided to go a different route. The hardest part of this project was taking down the existing blinds.
I got two $4 tension rods to fit in each window, and added three sets of $5 curtain rings.  Easy peasy.
(Anyone else live next to a house that has been abandoned for 4 years? Very annoying, esspeaccially in weed season.)
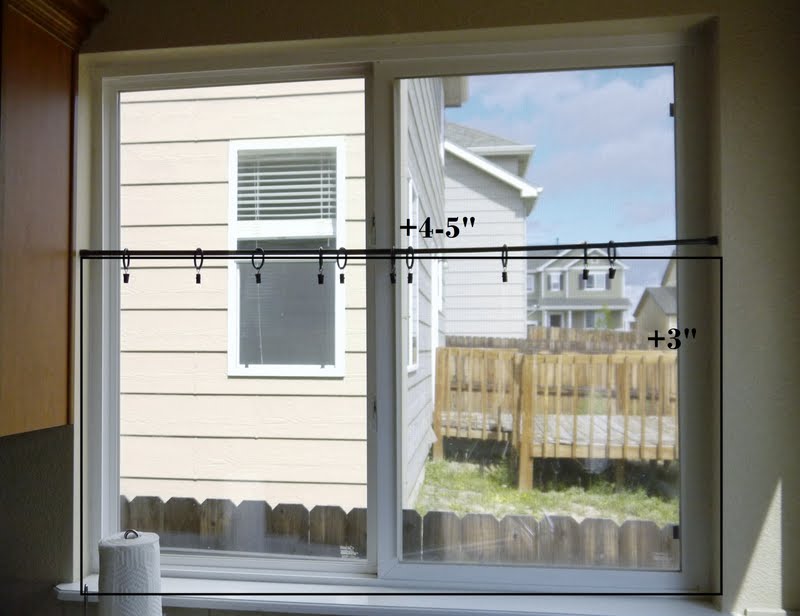
 Next step is to measure the area of window for your fabric. I measured, then added 4 -5 inches to the width, and 3 inches to the height for your seam allowances. (I actually did not add enough to the width, and the curtains ended up not being able to cover the entire area. It is okay because they will mostly be open, and it is not noticable, but learn from my mistakes.)
 Now you can cut your fabric to your measurements. Once you make your first cut, you will want to cut the fabric in half width wise, so you have two panels per window.
My Mom and I bought this fabric over a year ago when Wally world, aka - walmart, when they were doing away with their fabric section. It is upolstery weight, and it was only two dlaars a yard. I think I did both windows, with one yard, making the total fabric cost only 2$!
Next step is to fold 1/4" to a 1/2" on one side and press. Then fold again and press. Do this for both sides, and sew in place. Once your sides are done, you can repeat the steps for the top and bottom. Your corners should be nice and pointy. To eliminate these steps, you could try to find a cute cloth napkin that is already sewn for you, that would truly be the easiest curtains ever.  
 Yes my nails are really that awesome, and they are so easy! Check them out here! And if you are reading this before August 8th enter the giveaway here.

Once you have nice finished edges on all of your pieces of fabric, you can just clip them up, and you are done! I love how easy they will be to change when if I get tired of them.
 I think they go nicely with my fruit of the spirit plate.
 I really like them, and they are just what I wanted for the kitchen. Now I am feeling inspired to do more dishes, or maybe not!
Limking up to:
http://shabbynest.blogspot.com/
http://sassysites.blogspot.com/
http://tatertotsandjello.blogspot.com/
http://whipperberry.com/
http://brandyscrafts.blogspot.com/


Saturday, April 30, 2011

ABC art

I wanted to have some kind of art for the baby's room, but I was not ready to spend a bunch of money. I had a canvas that I had bought last year, and though I was planning on using for something else, who knows when that would happen so I thought it would be much better in the baby's room. This is really the only thing on the walls as of yet, but I will put something else up once we know what this little one is. Excitingly the baby's room is pretty much finished. Just in time huh? My personal deadline was May 1st, so I am happy that I am done.
For the ABC art I used a white canvas and used tape to make straight edges and painted the side and edges red. I used some fabric that I got from IKEA, and some heat n bond iron on adhesive to put on the letters.
I wish some of the letters showed up better, but I think you can still tell what they say. It is easier to see in person also. I really like it, and I think it adds a cute touch to the baby's room. Oh did I mention since I had everything already, it was free? Love that price.

Saturday, March 26, 2011

Thank you mail man

For my birthday I was blessed to receive two gift certificates to the fabricworm website from my mom and brother. After quite some time browsing and tweaking my order, I finally made a decision. Just a few days ago I received my order, and I was so excited to see my goodies.
 These birdies are one of my favorites. This will be used to make an accent pillow for our room. Can you guess the colors of our room? So cute!
 These are to make a car seat tent if the baby is a boy. I am not sure if I will make the cover before the baby is due, and then give it away if it is a girl. Or maybe I will save the fabric and wait to make a cover once I know for sure what baby is.
 This may be my favorite. It is for the girl car seat cover. Once again I can not decide if I am willing to part with it, if the baby is a boy. Really love this fabric, and I may just have to make something for me with it.
 This is for the baby, if she is a girl. I will be making a coming home outfit for the baby, and this will be part of baby girls outfit.
 And this is for baby boy's outfit.
 And this is for some accent pillows for the living room. Not positive I will use this for that, but I will find something great to do with it.
Excited to get to work, and make some great things. Even though I need no more fabric, why do I still love it so?  
Related Posts Plugin for WordPress, Blogger...