Showing posts with label easy. Show all posts

Sunday, November 4, 2012

Shoulda whoulda coulda

We are just going to skip over the whole "I am sorry I haven't blogged in forever, I have a million excuses" thing. I am simply lazy, and busy, but mostly lazy.
I do feel the blogging urge right now though. So here is just a little something on my mind.

Do you ever think about doing something, but never get around to doing it? And when you finally do it, you wonder what took you so long? You realize you should have done this long ago. This happens to me often.

Today, Bryson was once again trying to pull out everything out of my wallet at church and spilling everything everywhere, leaving my credit cards who knows where. Then later today he pulled everything out of Jeremy's wallet, mistakenly left on our bathroom counter. It was time. I was going to finally make time to get this baby his own little wallet.

For some reason Jeremy had an old wallet, and I had an old coach wallet (you can't throw that away!) So I found old cards I had given to the boys to play with, like old insurance cards and store loyalty cards. We always have a billion of those. I stuffed them all in the wallet, and voila.
I am telling you it was genius. Both boys were occupied with their little wallets for at least a total 45 minutes throughout the day. So why did I not so this sooner? I should have done this long, long ago! Now I am trying to decide if I should take away the wallets for a few days, and then bring them back.

This one is fun, the pen would make me a little nervous though.


Next on my list to keep my little guy busy....

So you have to tell me, what is something that I should have done long ago? It's the simple things that make Mom's lives easier, and they are too great not to share! Hopefully see you soon friends :)

Monday, September 19, 2011

Glass reinvented

Have you ever had craft supplies for a project for over a year and finally done it, and then wondered why it took you so long? No, just me? I seem to have a few things like this. My craft stash is getting quite full! This was one of those projects.

These have been all over the internet, but I still wanted to share my version. If you need a certain piece of glass, but can not find it or do not want to spend a fourtune, this is the project for you.

So easy, I am really kicking myself for waiting so long.
You just need a few supplies, E-6000 glue and your glassware that you want to work with. The cheaper the better I say, I got mine from the dollar store.
You simply add some glue where you want to attach your glass pieces, put them together.
Then you set something heavy on them and let them sit for awhile. I set mine aside for 24 hours. 
Now they are ready to use! I used mine at a Jamberry party for a vase, and place for some chocolate covered strawberries. 


Now the hurricane is part of my fall decor, and the pedestal plate is all ready for some sort of cake :)

If you need some new decor consider this, and you can use all types of plates not just glass. 
I love this idea! 
Have a fantastic week! 
   

Wednesday, July 20, 2011

5 minute hair clip

Last weekend while getting ready to go out to dinner with some friends. I thought my hair needed a little something extra. I decided to quickly make a little flower clip. It took me about 5 minutes, with taking pictures, and both boys were awake! 
First you will need a few supplies. I had all of these on hand so it cost me nothing! 
I always save all of my bobby pins each time I get an updo, so I never need to buy those. The satin fabric was from the lining of a dress that I shortened for a friend. And everything else was in my stash. 

First you cut your satin to the size circles you like, I think the less perfect the better. Cut concentric circles, so that you will be able to see the layers, I cut 6. 

Then you gently burn the edges. I like to use a candle, because it seems safer, and I never have been good at working lighters. If your circle catches on fire, that's okay just quickly burn them out. 

Now you can start hot gluing the layers down. Just a small amount in the middle will do. Start with your biggest circle and go smaller. On top of your last circle, glue a little jewel or you could also hand sew some seed beads. That would be very cute, but might take more than 5 minutes, and when you are already running late...

After your flower is done, simply glue it to a bobby pin or even a clip. Mine was sloppy, but who will see?
Put it in your hair and you are ready to go! 
Speaking of hair, I love doing my hair this way. I have been looking for cute ways to put up my hair, since it is always up anyway. I saw this hairstyle on I am Momma here me roar, and tried it. It looks great, keeps me cool, takes 5 minutes, and I can do it right out of the shower.

(Pre make up)

Saturday night after we got home, I did this heatless curls trick to my hair for church the next morning. And it looked great too. Love how blogs provide me with such great ideas!

Monday, March 14, 2011

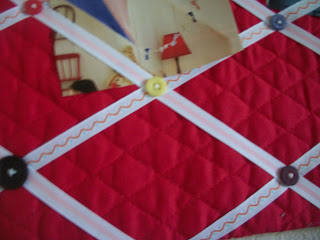
Idea Board

Wow! Time is flying by, and I feel like I can barely keep up. There is a change coming with blogging. If you haven't noticed it is quite sporadic. I have set a goal of twice per week, per blog, so four times per week. After baby comes, only 10 more weeks, then it will be once per week per blog, so twice per week. I think this is quite reasonable. Sorry for the lack of posting but, family, sanity, and sleep come first.
Now, of the few things I made for the wall in the everything room, this is my favorite.
It is my idea, or inspiration board, for ideas of things I want to complete. Of course if I had a picture for all of the ideas in my head, I would need a much bigger board.
I took a piece of cardboard, and some pre-quilted fabric I had left over from something I tried to make for Brady before he was born. I did end up making him a pillow with this, but I still have so much left over. I hot glued it to the card board, and started hot gluing my ribbons on, in the back. The lines on the fabric made it easy to line up the ribbons perfectly. Lastly, I sewed some buttons on to it, and it is done.
The ribbons can hold pictures, or notes or whatever.
Really easy, but I think it is pretty cute.
 

Tuesday, March 8, 2011

Cork Board

Who is ready for another boring post? Better than nothing, I guess!
Today I wanted to show you the cork board I made for all of the ideas and things I have going on in my head. It is in the everything room, that I promise to show you more of this week.
I simply took a sheet of cork that you can buy at any craft store, and hot glued it to a piece of cardboard. (And then I took terrible pictures...)
I also made a fabric flower, and sewed it on.
Fast and easy.  Practical for me, and I love anything that helps organization!
I have finished baby's crib skirt, the boy bumper, and the girl bumper. Super excited to start on the quilt today, and then I will have all of the baby's bedding done! Pictures soon!

Wednesday, March 2, 2011

Memo Board

This post may be quite boring. But I am diligently working on finishing things for the baby's room, and do not have much time for other crafts. I am making the baby's bedding, and it is taking a lot of time. I am also getting really tired recently. I am hoping it is just a big growth spurt for baby, and that is why I am so tired, but it may be just because I am now in my third trimester. Because I am so tired, I am sleeping in until Brady gets up, and going to bed shortly after he goes to bed. During naptimes, (which are getting shorter and shorter) is bible study, a little cleaning, and a little crafting time. After getting out, and cleaning up everything, I really have little time to craft. It will all get done eventually, I hope at least.
I have been in the process of making our office more functional for us. It is a small room, and we are cramped for space, so everything must be useful. In a few days, I will show you the entire room, how I have tried to make it better for us. But today, I just wanted to show you the memo board I made. It was very hard, let me tell you.
First, you take an empty frame, this one I had around the house, and put a piece of paper in it. You can use decorative scrapbook paper, or a plain piece of white paper. I chose to use plain, but I may add something different later.
Then you, glue a piece of velcro on your dry erase pen, and a piece on the frame.
Now it is ready to hang up and use.
(I can never have enough lists. My hubby thinks I am crazy, but the list making is genetic.)
So simple. I have seen some super cute dry erase boards in blog land, check them out!  

Saturday, October 9, 2010

Flash cards

Not much crafting going on around here. Too tired and busy working on this baby, and playing with a toddler. I am having so much fun though.

I did buy some flashcards awhile back in the dollar spot at target, and make them more functional for us. I saw this somewhere but I have looked and looked, and can not find which blog I saw this on. If you know who, please let me know, so I can give credit, thanks!

So easy! You take your flashcards, a hole punch, and a binder ring. Punch a hole in all of your cards, put them on a ring, and finished!
 Perfect for trips in the car, while waiting at a restaurant, or in the doctors office. Educational and fun.


Related Posts Plugin for WordPress, Blogger...