Tuesday, August 16, 2011

I won! And other giveaway nonsense

Yesterday I was looking for something I saw on Sassy Sites in the past, and I came across a post about a winner for a giveaway she had. Low and behold, I won! I was really surprised, because I rarely win anything like that, but mostly because I hardly ever enter. I only enter giveaways if I really want it. Like a Silhouette giveaway  I will enter, but much else, I am normally to lazy.

This giveaway was for some vinyl subway art, and I really wanted it so I entered. Still surprised I won!
Cute Huh? You can also buy one for $25, I think.
Also on the topic of giveaways, I was not that much of a fan of doing a giveaway. I am really happy the way mine turned out, but it did take some poking and prodding to get some entries. I thought it might bring some traffic to the blog, but not really that much.

So I would love your opinions, do you like giveaways? Do you enter them? Would love your input.

I am actually doing another giveaway on another blog for Colorado Springs Giveaways in a month. I hope it turns out well, but I am not sure. Like I said I don't really enter giveaways, so I guess I am sceptical, but who knows.  I did enjoy reading this post the other day on giveaways. Time will tell, and I reserve the right to change my mind.

Hope you are all having an amazing week so far. Be back soon with a little craftiness.


Friday, August 12, 2011

Camera Strap Cover

Second thought after getting my camera, "I can make a camera strap cover!" First thought was "Yay, a nice camera!"
I have known that once I got my nice camera, I would make a camera strap cover. I am surprised I waited the three whole days that I did.
 It is a little different than most camera straps because it is much thinner.
My favorite part about it is the pocket for the lens cap. 
Jeremy's least favorite part, it is girly and ruffled, and he feels silly taking pictures with it. 
 There are a ton of camera strap tutorials online you can search for. I kinda winged mine, but I think it turned out great. Sorry for the short post, it is way past my bedtime. Hope you all have a wonderful weekend.

Wednesday, August 10, 2011

Nursing Cover

I am on a no fabric buying thing lately. I am not even allowing myself to look at any fabrics. It is really hard, but the Hubby sure is happier.
One of the things that I wanted to make with some extra fabric was a nursing cover. It was really fast, and easy, just my kind of project. The fabric is slightly girly, but I still like it much better than my other boring black nursing cover. I used prudent baby's tutorial.
 The boning at top makes it easy to see baby, and he can get a little fresh air too.
 Of course I had to add my own little personal touch.
This would make a great gift for a new mom, and can be made in very little time. Try it out!

Monday, August 8, 2011

Jamberry Giveaway - A Winner!

I am so happy with how my very first Giveaway turned out! Thank you so much to everyone that entered! I even got to meet some new bloggy friends, how fun!

After my Jamberry launch party tonight my sweet niece, Chelsey, helped me out with a giveaway. We are very official around here, but do not worry I promise everything is on the up and up.


And the winner was #8,
chrisandlogue said...
and we are now a "Follower" of yours on facebook by liking your page!
CC
August 4, 2011 5:27 PM

My friend from high school Christy. Congrats Christy! I know you and Ellie, her sweet little girl will love these!

If you did not win, sorry! I hope to have another giveaway in the future, so check back.
In the meantime, if you want to try out Jamberry Nail Shields, let me know your address and a sample will be on your way!

Nail Shields are still buy three get one free, and free shipping on 3 or more if you associate with my launch party. Everyone at the party liked these tonight and I know you will also!  Here are Chelsey and Sis in law, Julie's nails.
I will be back in a few days with some more craftyness. Anyone else not have enough hours in the day? Hope you all have a blessed week!

Friday, August 5, 2011

Easiest Kitchen Curtains Ever!

I think that these cafe curtains are the easiest curtains you could make! They are just what I wanted for this area, and today I will show you the full how-to, not like you need it, they are that easy!
Here is what I was working with before. (The Colorado summer storm was rolling in, sorry for the dark pictures.) I always wanted some sort of window treatments on these windows. But I could not figure out what to do, because of the way the cabinets are so close to the window.

 How could you put a curtain rod anywhere near here without drilling into the cabinets? Thanks builder! That no longer builds in Colorado, by the way.
 So instead of drilling into the cabinets, I decided to go a different route. The hardest part of this project was taking down the existing blinds.
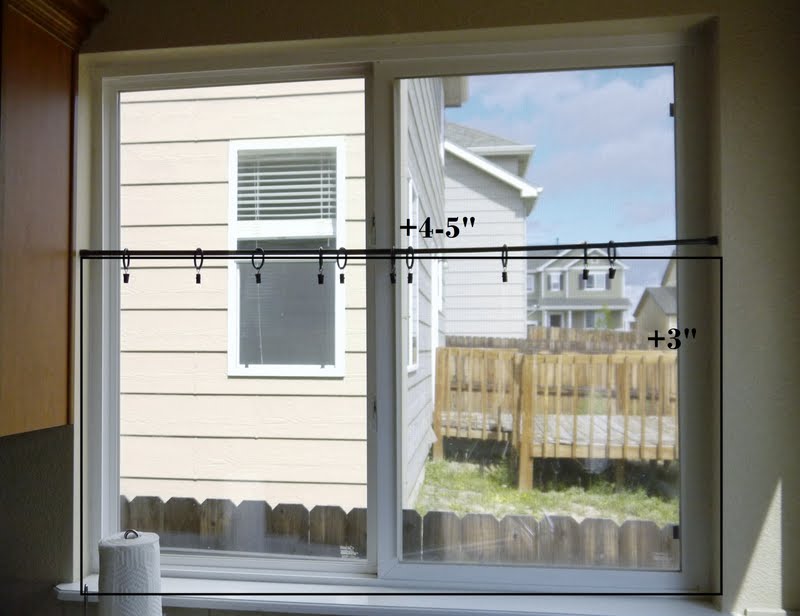
I got two $4 tension rods to fit in each window, and added three sets of $5 curtain rings.  Easy peasy.
(Anyone else live next to a house that has been abandoned for 4 years? Very annoying, esspeaccially in weed season.)
 Next step is to measure the area of window for your fabric. I measured, then added 4 -5 inches to the width, and 3 inches to the height for your seam allowances. (I actually did not add enough to the width, and the curtains ended up not being able to cover the entire area. It is okay because they will mostly be open, and it is not noticable, but learn from my mistakes.)
 Now you can cut your fabric to your measurements. Once you make your first cut, you will want to cut the fabric in half width wise, so you have two panels per window.
My Mom and I bought this fabric over a year ago when Wally world, aka - walmart, when they were doing away with their fabric section. It is upolstery weight, and it was only two dlaars a yard. I think I did both windows, with one yard, making the total fabric cost only 2$!
Next step is to fold 1/4" to a 1/2" on one side and press. Then fold again and press. Do this for both sides, and sew in place. Once your sides are done, you can repeat the steps for the top and bottom. Your corners should be nice and pointy. To eliminate these steps, you could try to find a cute cloth napkin that is already sewn for you, that would truly be the easiest curtains ever.  
 Yes my nails are really that awesome, and they are so easy! Check them out here! And if you are reading this before August 8th enter the giveaway here.

Once you have nice finished edges on all of your pieces of fabric, you can just clip them up, and you are done! I love how easy they will be to change when if I get tired of them.
 I think they go nicely with my fruit of the spirit plate.
 I really like them, and they are just what I wanted for the kitchen. Now I am feeling inspired to do more dishes, or maybe not!
Limking up to:
http://shabbynest.blogspot.com/
http://sassysites.blogspot.com/
http://tatertotsandjello.blogspot.com/
http://whipperberry.com/
http://brandyscrafts.blogspot.com/


Tuesday, August 2, 2011

Car seat cover

One of the only things I was able to sew in the first two weeks after Bryson was born was a Car seat cover. It was essential, and I love it!
I bought this fabric a long while back, and knew it would be used as a car seat cover if the baby was a boy. And he is! If you can't tell I love bright colors for babies, and I think they enjoy it also.  
The Cover was super simple to make. I used about 2 yards of quilting cotton fabric.
You could definitely use a heavier fabric for winter and cooler months.
After cutting the fabric to the size that would fit nicely on on the car seat, I rounded the corners.
Then I sewed right sides together around the edge, with a small opening.
After turning it right side out, and ironing it nice and crisp, I did a top stitch around the edge.
The handles are sewn on the outsides on both sides, so it can be reversible. They stay on the car seat handle with a small strip of velcro, and the handles also have small decorative buttons.
Of course Bryson needed matching strap covers.
Sometimes they even get a little slobbered on.
It stays in the car mostly. Perfect to have on hand for those Colorado afternoon thunder storms. And it really works well as a blanket in a pinch. We love it, and it is so easy to make, try it out!

Linking up to:

Monday, August 1, 2011

Jamberry Giveaway!

I am loving being a Jamberry Nail Shields Consultant! In celebration of receiving my new consultant kit today, I am doing a giveaway of a pair of nail shields of your choice! Are you exciting to try this awesome product out for yourself, then make sure you enter!
 
Entering is really easy, and you can even get 8 chances to enter!
  • One entry - go to my Jamberry site and tell me what style you would choose, then leave the answer in the comment section of this post
  • Another entry -Be or become a follower of this blog
  • Another entry - Be or become a follower on facebook
  • Another entry - subscribe to the blog via email
  • Another 2 entries - Share on facebook with a link back to the blog
  • Another 2 entries - Share in a blog post with a link back to the blog
For each entry leave a comment, and make sure I can get into contact with you. Giveaway will end Monday August 8th, 10:00 p.m. Mountain Standard Time.
For those of you who cannot wait to win the giveaway, you can go online and order right now! The buy 3 get one free special is still going on, and you can get free shipping when you buy at least 3 shields. Just make sure you choose the option that you are associated with a party, my launch party.
Can't wait to see what style everyone likes, and who wins. Good Luck!
Related Posts Plugin for WordPress, Blogger...